radiance
Ouwe rot
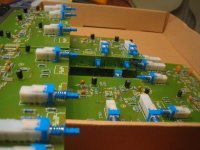
Matrixxx is een keiharde werker......")
Follow along with the video below to see how to install our site as a web app on your home screen.
Note: This feature may not be available in some browsers.
Origineel geplaatst door radiance
Matrixxx is een keiharde werker......
")
Origineel geplaatst door Steven V
Ik ben zelf ook bezig met het maken van een SSL kloon. Ik heb de prints laten etsen bij mij op school (waar ik niet voor hoef te betalen aangezien ik student electronica ben).
Na alle gaten te hebben geboord (toch een flink karweitje) kwam ik tot de vaststelling dat de boorgaten niet op de juiste afstand staan; een IC past er gewoon niet in! Dit kwam omdat Adobe PDF viewer de printout geschaald had... Alle mensen die zelf een kalkpapiertje gaan bedrukken zijn bij deze dus gewaarschuwd!
Waar ik zelf nog wat vraagjes over had: Als ik reeds afgeregelde THAT IC's gebruik, mogen de 50k distortietrimmers blijkbaar weggelaten worden. Wat moet ik dan op de print steken i.p.v. zo'n trimmer? Ik veronderstel draadbruggen, maar waar moet ik ze steken?
Op de site van Radiance staat dat hij van een 2x6 draaischakelaar een 2x5 draaischakelaar heeft gemaakt. Hoe doe je zoiets eigenlijk?
 ) en ik heb de print de volgende dag... als dat niet snel is
 Origineel geplaatst door Steven V
Waarom zou ik een print bestellen als het gewoon veel gemakkelijker is om hem bij me op school te laten maken (ik zit daar toch alle dagen)? Het kost me overigens gene rotte eurocent (goedkoper dan gratis kan volgens mij niet meer
Origineel geplaatst door Steven V
...........Na alle gaten te hebben geboord (toch een flink karweitje) .......
(ok, ok, drie vragen dan....)Origineel geplaatst door Steven V
........Nog een klein vraagje: op de printout van de PDF waar alle componenten moet komen, staat bij de 1K weerstand net onder de 5534 een sterretje. ik kan echter nergens op die pagina vinden waarvoor dat sterretje dient...
You can just use this meter in place of an analog one. However, you do have to remove (or not mount) the 2k resistor on the GSSL main board in order to get the meter to work properly.
I have uploaded the source files: the .sch (schematic) file and the .brd (board layout) file on my webspace. Sorry for the messy schematic, but it's the board which will concern most people I think.
You are free to use and alter this board and/or schematic for your own use, as long as you don't going to make money of it.
Some more infos about the meter:
This circuit is based upon the LM3914 bargraph LED driver, with the design of the circuit directly from the datasheet. I added a straight-from-the-book inverter based upon the TL071 opamp (made by Texas Instruments and ST Microelectronics, amongst others probably) to invert the voltage coming from the GSSL main board.
There is a jumper on the board which lets you choose between dot-mode and bar mode. Place the jumper if you want the meter to work in bar mode. If you don't place the jumper the meter will work in dot mode. You can of course change the board layout so that te meter always works in bar mode if you like.
The meter displays gain reduction in steps of 2dB for each led, with 20dB displayed if the top led is lit. The lowest led is just connected via a resistor to the supply voltage and is thus always lit. This led acts as my 0dB led and also as an indication that the SSL clone is turned on.
If you can, you should apply 2V DC (e.g. from a linear power supply) to the input of the meter and turn the pot just until the top led lights. The meter will then be calibrated. If you do not have access to such a power supply, trim the pot to 1,133k. You can use any value of pot which is bigger than 1,133k because only two terminals of the pot are connected. I have used a 2,2k pot.
The meter is designed to work with the -15V and +15V which are available from the GSSL main board. The meter will also work with lower supply voltages, altough one would probably have to change the resistor values in order to work properly. Refer to the LM3914/LM3915 datasheet.
The board has been tested with an LM3914 @ +-15V DC supply voltage andit seems there aren't any errors (the board works perfectly). However, if you do find any, please let me know and I will correct them.
Just remember to get the 2k resistor on the main board out, and connect the input of the meter to the output of the opamp on the main board (you can use the hole of the 2k resistor which you have just got rid of for this). Gnd goes to gnd, -15V to -15V, +15V to +15V. It's all pretty obvious I guess.
Toch niet hard in ieder geval...Origineel geplaatst door Steven V
Herens en damens, ik heb z'n GSSL kloon gebouwd en heb daarvoor een LED meter voor de gain reduction gemaakt. Ze is getest en het werkt, dus als iemand interesse heeft in de PCB hiervan, ik heb de source files (voor het programma Cadsoft Eagle, freeware en te downloaden @ http://www.cadsoftusa.com) op m'n webspees gezet.
Meer info vind je hieronder. Dit is een kopie van wat er in de thread op het Prodigy-Pro forum te vinden is (ik heb helaas geen zin om m'n Engels te gaan vertalen).
Mocht iemand vragen hebben, stel ze maar, ik zal niet bijten
Origineel geplaatst door EDP
zo eindelijk tijd om mijn tweede ssl af te maken.
@ matrix
die molex connectors voor de xlrs zijn nogal geil. wet je toevallig nog het order nummer van de jouwe?
by farnell toch?